 The September 2009 Daring Bakers' challenge was hosted by Steph of A Whisk and a Spoon. She chose the French treat, Vols-au-Vent based on the Puff Pastry recipe by Michel Richard from the cookbook Baking With Julia by Dorie Greenspan.
Making the flaky,buttery puff pastry at home without anything artificial and at cheaper price ,was an incredible experience.Little time-consuming alright ,but if you can roll a dough then making the professional quality pastry dough is not impossible.The steps of making the supple ,smooth,lovely pastry dough are pretty straightforward,there is lot of waiting time and the dough has to be cold at all times,if possible also keep the rolling pin cold in the fridge.The filling variations are endless,fruity,savory or meaty,pick your choicest.So next time you are in the mood for the buttery goodness think of baking one of your own from the scratch.
Michel Richard’s Puff Pastry DoughPuff pastry is in the ‘laminated dough” family, along with Danish dough and croissant dough. A laminated dough consists of a large block of butter (called the “beurrage”) that is enclosed in dough (called the “détrempe”). This dough/butter packet is called a “paton,” and is rolled and folded repeatedly (a process known as “turning”) to create the crisp, flaky, parallel layers you see when baked. Unlike Danish or croissant however, puff pastry dough contains no yeast in the détrempe, and relies solely aeration to achieve its high rise. The turning process creates hundreds of layers of butter and dough, with air trapped between each one. In the hot oven, water in the dough and the melting butter creates steam, which expands in the trapped air pockets, forcing the pastry to rise.This
wonderful on-line video from the PBS show “Baking with Julia” makes it easier to understand the procedure.
Prep Times:
-about 4-5 hours to prepare the puff pastry dough (much of this time is inactive, while you wait for the dough to chill between turns…it can be stretched out over an even longer period of time if that better suits your schedule)
-about 1.5 hours to shape, chill and bake the vols-au-vent after your puff pastry dough is complete
Recipe From: Baking with Julia by Dorie Greenspan
Yield: 2 pounds dough
 Ingredients:
2 cups unbleached all-purpose flour
*1 cup cake flour
1 teaspoon white vinegar(optional)
1 teaspoon salt (you can cut this by half for a less salty dough or for sweet preparations)
1 cup (10 fl oz/ 300 ml) ice water
2 sticks cold butter very cold unsalted butter
plus extra flour for dusting work surface
*if you can't find cake flour use all purpose flour instead.
MethodMixing the Dough:
Put the all-purpose flour, cake flour, and salt in a food processor and pulse a couple of times just to mix. Add the water all at once, pulsing until the dough forms a ball on the blade. The dough will be very moist and pliable and will hold together when squeezed between your fingers.
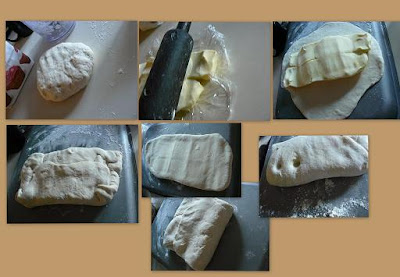
Remove the dough from the machine, form it into a ball, with a small sharp knife, slash the top in a tic-tac-toe pattern. Wrap the dough in a damp towel and refrigerate for about 5 minutes.
Meanwhile, place the butter between 2 sheets of plastic wrap and beat it with a rolling pin until it flattens into a square that's about 1" thick. Take care that the butter remains cool and firm: if it has softened or become oily, chill it before continuing.
Incorporating the Butter:Unwrap the dough and place it on a work surface dusted with all-purpose flour (A cool piece of marble is the ideal surface for puff pastry) with your rolling pin, press on the dough to flatten it and then roll it into a square. Keep the top and bottom of the dough well floured to prevent sticking and lift the dough and move it around frequently. Starting from the center of the square, roll out over each corner to create a thick center pad with "ears," or flaps.
Place the cold butter in the middle of the dough and fold the ears over the butter, stretching them as needed so that they overlap slightly and encase the butter completely. (If you have to stretch the dough, stretch it from all over; don't just pull the ends) you should now have a package that is 8" square.
To make great puff pastry, it is important to keep the dough
cold at all times. There are specified times for chilling the dough, but if your room is warm, or you work slowly, or you find that for no particular reason the butter starts to ooze out of the pastry, cover the dough with plastic wrap and refrigerate it . You can stop at any point in the process and continue at your convenience or when the dough is properly chilled.
Making the Turns:Gently but firmly press the rolling pin against the top and bottom edges of the square (this will help keep it square). Then, keeping the work surface and the top of the dough well floured to prevent sticking, roll the dough into a rectangle that is three times as long as the square you started with.With this first roll, it is particularly important that the butter be rolled evenly along the length and width of the rectangle; check when you start rolling that the butter is moving along well, and roll a bit harder or more evenly, if necessary, to get a smooth, even dough-butter sandwich (use your arm-strength!).
With a pastry brush, brush off the excess flour from the top of the dough, and fold the rectangle up from the bottom and down from the top in thirds, like a business letter, brushing off the excess flour. You have completed one turn.
Rotate the dough so that the closed fold is to your left, like the spine of a book. Repeat the rolling and folding process, rolling the dough to a length of 24" and then folding it in thirds. This is the second turn.
Chilling the Dough:If the dough is still cool and no butter is oozing out, you can give the dough another two turns now. If the condition of the dough is iffy, wrap it in plastic wrap and refrigerate it for at least 30 minutes. Each time you refrigerate the dough, mark the number of turns you've completed by indenting the dough with your fingertips. It is best to refrigerate the dough for 30 to 60 minutes between each set of two turns.
The total number of turns needed is
six. If you prefer, you can give the dough just four turns now, chill it overnight, and do the last two turns the next day. Puff pastry is extremely flexible in this regard. However, no matter how you arrange your schedule, you should plan to chill the dough for at least an hour before cutting or shaping it.
Forming and Baking the Vols-au-Vent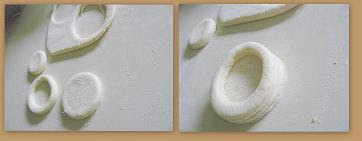
Yield: 1/3 of the puff pastry recipe below will yield about 8-10 1.5” vols-au-vent or 4 4” vols-au-vent
MethodLine a baking sheet with parchment and set aside.
Using a knife or metal bench scraper, divided your chilled puff pastry dough into three equal pieces. Work with one piece of the dough, and leave the rest wrapped and chilled. (If you are looking to make more vols-au-vent than the yield stated above, you can roll and cut the remaining two pieces of dough as well…if not, then leave refrigerated for the time being or prepare it for longer-term freezer storage. See the “Tips” section below for more storage info.)
On a lightly floured surface, roll the piece of dough into a rectangle about 1/8 to 1/4-inch (3-6 mm) thick. Transfer it to the baking sheet and refrigerate for about 10 minutes before proceeding with the cutting.
Using a ¾-inch cutter for small vols-au-vent, or a 2- to 2.5-inch round cutter for large, cut centers from half of the rounds to make rings. These rings will become the sides of the vols-au-vent, while the solid disks will be the bottoms. You can either save the center cut-outs to bake off as little “caps” for you vols-au-vent, or put them in the scrap pile.
Dock the solid bottom rounds with a fork (prick them lightly, making sure not to go all the way through the pastry) and lightly brush them with water. Place the rings directly on top of the bottom rounds and very lightly press them to adhere. Brush the top rings lightly with water, trying not to drip any down the sides (which may inhibit rise).
Refrigerate the assembled vols-au-vent on the lined baking sheet while you pre-heat the oven to 400ºF (200ºC). (You could also cover and refrigerate them for a few hours at this point.)
Once the oven is heated, remove the sheet from the refrigerator . Bake the shells until they have risen and begin to brown, about 10-15 minutes depending on their size. Reduce the oven temperature to 350ºF (180ºC). If the centers have risen up inside the vols-au-vent, you can gently press them down. Continue baking until the layers are golden, about 15-20 minutes more. (If you are baking the center “caps” they will likely be finished well ahead of the shells, so keep an eye on them and remove them from the oven when browned.)
Remove to a rack to cool. Cool to room temperature for cold fillings or to warm for hot fillings.
Baked vols-au-vent shells can be stored airtight for a day.Shaped, unbaked vols-au-vent can be wrapped and frozen for up to a month
Vols-au-vent with Sweet Peach and Plum FillingPrepare flavored sugar syrup by boiling 1/2 cup of water with 1/4 cup sugar with whole spices like cinnamon and cloves until thick and syrupy.Fish out the whole spices.
Thinly slice the ripe peaces and plums and arrange in baked shell( vols-au-vent).Pour about a tablespoon of syrup on each shell along the fruit filling.Bake on 350F for another 6-7 minutes and serve warm or cold.

The picture is my entry for
Garnish the Dish over at
Innovative In-laws(Nithya and Pavithra)


